Monday, March 8, 2010

Bunnicus

Who's that sexy rabbit.
Bunnicus!
IN 3D!!!!Yes it's a small image and it's rather poorly rendered.
I'm having so many technical issues with 3DS Max and it's hard to learn the program (on my own) while modeling and texture mapping this dastardly rabbit!

This is Bunnicus by the way, from the previous post :)

Sunday, March 7, 2010

Stop!

Everyone's familiar with stop motion animation: Chicken Run, Coraline... etc.

Check out this rad combination of music and stop motion.
MysteryGuitarMan: Root Beer Mozart

Friday, March 5, 2010

Color toned


SORRY FOR THE LAME IMAGES. SCANNERS AND I DO NOT GET ALONG.

So as much as I enjoy colored paper, it's just so hard to really build up lights and darks with it. It really throws me off sometimes when I use a color as a mid-tone value.
On top of that, we only get about 30-40 minutes to do a 'still life' drawing. And the model needs breaks so nothing is really 'exact'.

So I feel like I could do a lot better with more time.


I was wrong: The actual drawing is more pleasing to the eye in person. The scan just didn't come out right... There's a glare from the graphite. I guess I should use the smoother side of the paper? I believe this is Strathmore... or was it Canson. Oh well. This was a rather long drawing, I guess I got bored with it after an the usual 30-40 minutes we have and just kinda ruined it by mindlessly sketching at it.

I think I'll use the 'preferred' side of the paper instead of the textured back the next time I attempt to shade/complete a drawing. Maybe that way it'll prevent future glare?

Question for you all! What's your biggest challenge when work long period drawings/assignments/music/anything? Do you feel like you hit a certain point during the process only to think that if you continue you'll just ruin it?

Also: Do you prefer the rough side or the smooth side of drawing paper?

Look at what I found!


(Click on the images for a clearer image/color idea: Im unsure why the color's are muted as I upload them)


My freshman year, we had to work with color in our Method's and Concept class.
We learned about shades and how it can effect everything!
Scintillation for example, is when two colors are similar in saturation and shade, causing a bit of a swimmy movement between the two. It makes me so dizzzzyyyy.

Now hopefully, if your computer settings allow you to- you can see my "psychedelic" poster staring the infamous pokemon: Mudkip!

Sadly, my old laptop was stolen, and I lost my original poster. I only have the screenshots and other clips that I had taken.


(Ps: I drew this mudkip in Illustrator, alright! No copying and pasting here! We don't tolerate that!)

But I will claim ownership over the work of this poster.


©Shan

Thursday, March 4, 2010

More sluggish than a drunken snail!

Dun dunnaa duuuuun!
Bunnicus! Silly. Rabbits can't fly...

(I know the animation was a bit choppy- but the point of this was to show animation IN GENERAL is possible!)
---
So a few questions:
Do you currently have Photoshop CS3?
Do you enjoy gifs?

Did you KNOW that you can MAKE gif animations on Photoshop Cs3?


©Influential Nonsense


Well! Allow me to teach you how!

First:

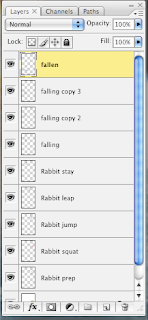
Draw out your animations frame by frame separately: one on each layer. This pile of boxes is my background. The individual frames of the rabbit moving are all on separate layers:


Second: After you've drawn out your frames or
what you want to animate. Go to windows
(I'm using a mac but on a Windows it should be under the same name)
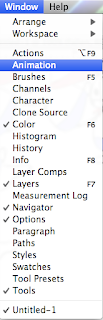


Select Animation and an
animation window should come up.


Select the menu tab at the very end of the of the animation window bar:


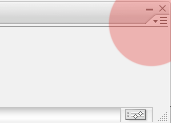
And Select "Make Frames from Layers".


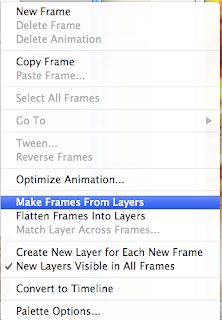
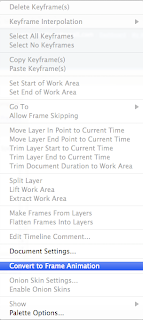
If you don't see that option, look for "Convert to Frame Animation" and then you should be right on track!


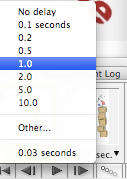
You should be able to see the frames individually and you can edit the lengths of time on each frame:


If you're not satisfied
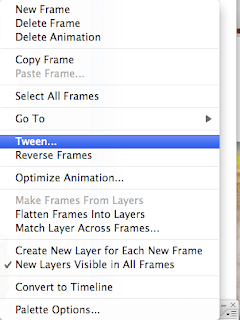
ed with the transition, as in- it's too choppy!
You can go to the same menu on the side (where you selected to change the frames to individual ones) and selected "Tween".

That this does is, it adds more frames and 'makes up' what you're 'missing' in between the two frames. So if you feel the need to smooth out your movements of your animation, selected this.


Once you're finished and satisfied- you can now save it. (If you'd like to preview it before hand, simply hit the 'play' button on the bottom of the animation window:


To save, simply go to file and select "Save for Web & Devices".
Or you can export it as a movie.
On windows, I believe you can simply save it as a .gif.


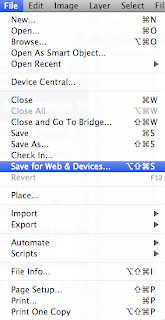
As you save, this prompt will come up:


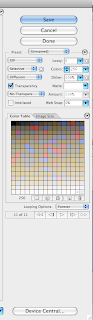
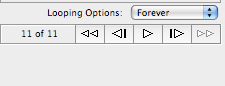
And if you want your animated gif to loop continuously, make sure you SELECT 'Forever'.


And there you have it! Your very own gif.

Good luck!

Wednesday, March 3, 2010

Transitions


So my biggest struggle? Shading.
I was never into smudging. I remember doing it when I was younger, thinking it was the coolest thing ever. What a great process! But then I realized that not everything looked like shiny metallic.
This is a life drawing that I did for about...45 minutes I believe. It still has my usual cartoony-style, a habit I'm trying to break. I'm really invested in developing my skills in realism.

I will succeed!

Nu nude

We finally had a different model in Life Drawing II. I mean I adore Angela (the usual model) but I've drawn her for so many classes ...change is needed!

This woman, Julie I believe- is just lovely. Such a kind face and she strikes amazing (and challenging) poses during our 1 hour session of 5 minute gestures.
Lovely!